I was at a friend’s house picking up some lumber a few weeks ago. I grabbed some rough walnut, pear, cherry, and oak. As I’m leaving, he points to a big pile of rough cut slabs of cherry and asks if I want one of those.
Naturally, my curiosity is piqued. I’ve never worked with big slabs of 4″ thick wood before. The ideas start flooding my head and I go ahead and grab one of the smallest ones. Questions are raised if all that wood can actually fit in the Jeep (the slab is pretty damn heavy), but I don’t listen to that malarkey. I just want to take my new slab home and hug it.

We had big fun that night
Then reality set in. What was I really going to do with that thing? I had never worked with slab wood, I didn’t want to mess it up. I had only gotten one…what was I thinking? I should have grabbed three! Much less pressure if I had three.
After a couple weeks, I decided to do something with this gorgeous piece of wood. After all, even if I messed it up (kind of a certainty), I could go get another one. The dude had about 30 of them.

What do you want to be, darling?
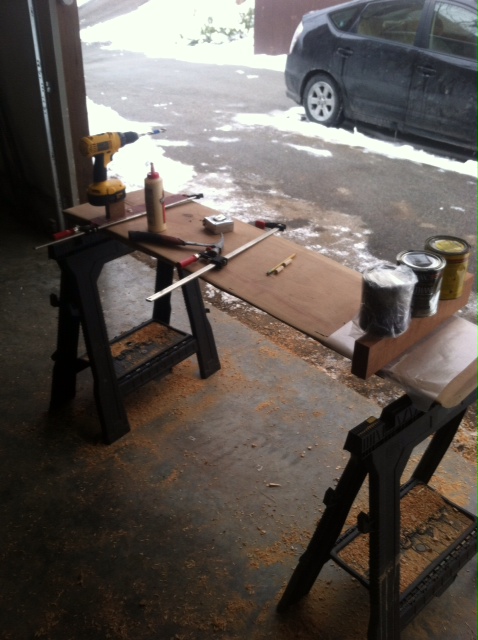
I started by chopping off about two feet. This way I could get two tables out of it, one big one and one smaller, side table sized one. Then, because this chunk of wood is wider than any planer I have access to, I spent an afternoon manually sanding the rough cut wood. It sucked.

I really hate sanding.
I put a light chamfer on the edges with my block plane and started thinking about the legs. I knew I was going to use the 3″ square cherry timbers I had, I just wasn’t sure how I wanted to join them.
Here’s the sneaky thing about working with slabs of wood. They move. A lot. Normal changes in humidity throughout the year will cause the slab to flex and shrink. If you have a standard apron built onto the bottom of the table to house the legs, the top can’t move and it will twist instead, wreaking all kinds of havoc. I’ve never seen this happen, but it makes good sense to me. This is the reason so many tables and things are made of smaller pieces of wood glued together. Those tops are just much more stable in the long run.
Sooo…….The wood will try to break itself if I don’t allow it to move around a little. This means I needed free legs, by that I mean legs that attach directly to the slab rather than each other. This should allow the wood the freedom to swell and shrink without distorting the top.
Seems easy enough, then. I’ll just cut some mortises into the top with my forstner bits and chisel them out.
I learned a few things really quick at this point. First, my nice set of chisels aren’t really made for clearing 4″ of wood. Second, when you force them to do it (because that’s how I roll), it will peel the wood off the bottom of the mortis. Ugly, but it’s the bottom, I don’t care.
So, I drill a bunch of holes into the area to chisel out, hoping that makes it easier.

Well, that didn’t work. Shocker!
And here we are. I’ve ruined the damn top. Just what I feared. This thing is now ugly as hell, No way will the tenons fit snugly. It will be the ugliest through tenon ever.
Yeah..so….Fuck. Self-fulfilling prophecy? I don’t care. I grab a beer. I say Fuck again. I walk back to the woodshop to sit on my stool and wallow in my failure.
While sitting there, sipping a Hopslam and laughing at myself, I see the small purpleheart board given to me by a professor who is studying rates of decay among various woods, native and exotic. This was the one piece she had leftover and she gifted it to me over four years ago.
I took another drink of the Hopslam. Could I use that wood in this project? Did the tenons have to be through tenons? Could I just inlay that pretty wood and cover up my shame? 60% of the time my beer addled ideas work every time!
I grabbed my router and tried to figure out how to actually inlay wood. I use some 1/4″ plywood to make a guide for my router and then a straight bit to clear out the wood and make the hollow area (this probably has an official name) in which I lay the purpleheart. I snuck up on the thickness of the inlay and actually got it to fit in there pretty nice. Damn, that was easy!
The biggest problem was that I barely had enough wood to cover the existing mortises. (Yeah, I went ahead and mangled all four of them. Why stop at one?) Then I glued and pegged the purpleheart into the cherry and weighted it down overnight to dry. Because of the natural edge of the cherry it was impossible to clamp it down due to the curvature of the outer edge. My clamps sat there….sad and unused.
The wax paper keeps the glue from attaching to anything else.
Then all I had to do was attach the legs, glue those into place and run a peg down into them to help strengthen the joint between the leg, table, and inlay. I left the legs pretty simple. I entertained the idea of putting neat angles on them with my band saw or turning neat patterns on them with the lathe, but I really wanted this table to be more simple.
Oh, and sand more. A lot more.

The grain really turned out nice. Sanding has a purpose…I guess.
After all that, I put on three coatings of semi-gloss polyurethane, sanding with 220 between each coat. And she’s done. It’s not a perfect table, far from it. It’s functional, unique, and pretty, though. Plus, the purpleheart and the pegs almost look like straps running over the table top, which I like.
One of the best things about woodworking is that nothing is set in stone. If you have the right tools, you can adapt when you make a mistake (or four mistakes).

Finished product
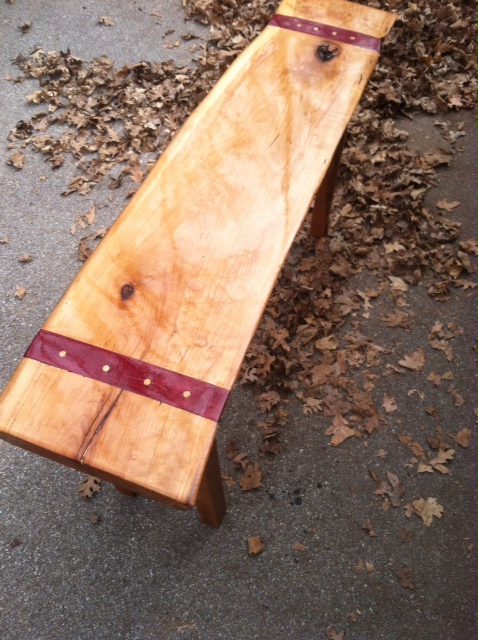
Different angle
This was a fun project. All in all, it took maybe 7 hours or so, but thanks to the whole “glue needs to dry” business, it needed to be spread out over several days. They say you can work with the glued objects after an hour, but I tend to be rough on things and I have pulled them apart when I try that. Plus, I’m not in any kind of rush, ever.
If you stumble across a slab, don’t let it get past you. Grab it, crack open a good beer, scratch your head a bit, and figure out something to do with it.
Have fun!


So you don’t like to sand. To move a lot of material quick I use my belt sander. I have a very nice planer but it is limited to 12 1/4 inch material. The wider ones are cost prohibitive and usually require many extra amps of 220 electricity which my 100 amp panel doesn’t have. Through a friendship with the local High School shop teacher I can occasionally use his 24 inch planer but it’s usually not worth the hastle. Your cherry/hopslam table looks great. I like working with mill slabs. I often get some cedar from St Charles County Parks.