
The Italians and Spaniards don’t have a name for air-dried venison backstrap. That’s a problem.
On a cow, this cut would be called the loin, but it’s a deer so we just call it a backstrap because….I don’t know…it sounds better than loin? It certainly makes more sense because it’s a strap shaped chunk of meat that runs down the back. If we air-dried a beef loin it would then be called Bresaola. If it were done to a pork loin it would be called Lonza (in Italy), Lomo (in Spain), or vegetable (in Germany). The type of animal matters, this is civilization!
Since our finished product has no official name, I feel compelled to name it…you know, for the good of the world.
I shall call this delicious meat product Ssourah (pronounced Zoo-rah) because this lovely deer was born and raised in the wilds of Missouri. Deer are very big on representing their local area, that’s what all the scrapes and rubs are about after all. So it’s Ssourah. Got it? Okay. Now let’s make some tasty Ssourah!
First, you take a chunk of backstrap and plop that bad boy on your cutting board. While venison lacks intramuscular fat, it is loaded with thick connective tissue on the outside of each individual muscle. This is commonly called “silverskin”. Hooray for learning!

Backstrap in need of a trim.
Silverskin is pretty much like chewing on a silicon baking mat but without all the delicious cookie residue, so it needs to be removed along with any little bits of fat or anything else white. A regular old filet knife is what I use for this. You don’t need any fancy damascus steel blade, the filet knife really works the best because it can slide beneath the silverskin and remove it without accidentally removing any of the delicious meat.

Trimmed up and ready to party
The key to any cured meat is salt. It’s the only rock we eat and it serves some seriously important roles. If you are named Pyornkrachzark (or you happen to be a different Rock-biter) the previous sentence does not apply to you. Now, in this instance, I know all about the chunk of meat sitting on that cutting board in the picture. I killed the animal and butchered her. I know it was not dropped on the floor of some factory or contaminated with poop. Still, we need the salt in order to allow this cut of meat to hang in the open air and dry out. It’s never being taken above room temperature, but it will still be safe to eat once fully dried. In fact, this particular piece of meat was the warmest when it was actually alive.
My cure is a mixture of kosher salt as well as some garlic and black pepper. “But what about the curing agent? You’ll die!!!” With whole cuts of meat (that don’t have a bone in them), you don’t actually need sodium nitrate. We know the inside is not contaminated because it’s never been exposed to the air and we are about to use the magical powers of salt on the outside parts. You can toss some cure in there if you want to though, it won’t hurt anything. In fact, it will give a nice hammy flavor, if that’s your thing.

A freezer bag with a bunch of kosher salt and some spices. Oh, and meat!
Plop your cut of meat in the bag with the salt and flavorings and shake it up. I suggest dancing while doing it, the deer that gave it’s life would appreciate it as long as you’re not twerking. Twerking and meat curing have no place together. I suggest a Mexican Hat Dance, but you’ll need at least one friend around for that.

That’s some good shaking!
After you get a good coating of salt stuck to the meat, you are ready to bag it up and let the salt work its magic. I use vacuum seal bags but I don’t suck them fully tight. I take out about as much air as I could remove by hand. It just seems easier for the brine to come out, plus garlic and anaerobic conditions don’t play well together. “Then why use the vacuum sealer?” Shut up.

Me and my meat
Pose for every photo opportunity with your meat that comes your way. It just makes sense. Now that’s it’s sealed up, toss it in the fridge, preferably with some weight on top to squish it down, a full sack of flour or sugar works great. Leave it in the fridge for one day for every two pounds. That’s the guideline anyway, I will leave this in the cure for 2-3 days even though it only weighs about 2 pounds. I like it a touch more salty than most, more on that later.
While it sits in there, the salt will soak inside and draw moisture out. You will notice that even though the meat went in dry, a liquid brine has formed all around it after twelve hours or so. That’s the salt doing it’s job. The weight on top just helps it work even better. flip the meat over one time during the fridge curing. After the curing time is up, pull your precious out of the fridge and rinse it off very well in cold water. This is to remove all the salt on the outside. If you don’t rinse it off it will be too salty to eat. Trust me.
Then pat it as dry as you can get with kitchen towels (wash them later, it’s all good, remember the rant?) then poke a hole in the top of the backstrap with a knife. This needs to be no less than a half inch from the top so it doesn’t tear and drop your Ssourah to the floor. Now is the time to weigh the backstrap on your kitchen scale. If you don’t have a kitchen scale, order one now from Amazon. You will find many uses for it. Then just thread some butchers twine through the hole and hang it in your curing chamber.
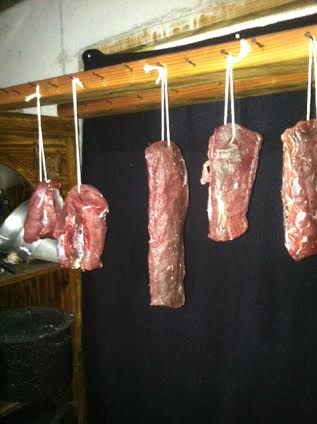
Did you think I only did this to one chunk of backstrap? You don’t know me.
You may notice the little deer hams over on the left of the hanging stick. They were treated the exact same way, except they are hams so they would need a different name. Comment and let me know what you think the hams should be called!
Now we enter the phase of trying not to go look at it all the time! It’s the hardest part. These will need to hang for a month or so in the conditions of my basement. 55% percent humidity and 50 degrees. Since it’s cold down there now, mold won’t grow, but when I do this in the summer the Ssourah gets a thick coating of white mold. Perfectly safe, perfectly harmless, nothing to worry about.

Starting to look pretty funky!
The above photo is after two weeks hanging in the open air. The meat has darkened and shriveled as it’s lost its moisture (so…many….jokes…). You can gauge how much moisture you have lost by weighing it again. These are down about 17% right now and you need 30% to be safe. Still, that’s too soft for me and I take them down to 40 or even 45% moisture loss. As your Ssourah loses moisture, it will get harder. I dry mine more because I like to cut extremely thin slices off. When you do this, the slice basically melts on your tongue like some kind of crazy backstrap cotton candy. This is where the extra little bit of saltiness really shines through, for me at least.
Since we are not even halfway to our target weight, this is not ready to eat yet. When it’s fully dried in a few weeks, I will write up part 2 of this meat saga and describe in a little more detail why this meat is actually safe to eat. Also, hopefully I’ll have a name for air-dried venison hams by then! Send ’em in, people!


Doe Chet ahh